Thermo Tracer TH9100 MR / WR / MRI / WRI
Firmware Update Download
Update Contents
This update consists of the following.
Adding the emissivity setting function on the thermal imaging screen.
How to Upgrade
- Software Name : TH9100 Firmware Program
- Supported Models : TH9100 MR / WR / MRI / WRI
- File Name : th9100mrwr.exe (Self-extracting file)
When upgrading, follow the instructions below. Failure to do so may damage the embedded flash memory in the TH9100 main unit, causing improper operation. If the TH9100 does not function correctly,
it must be repaired by Nippon Avionics. (Repair available at cost.)
1.Cautions
- TH9100 Firmware Program is exclusive for TH9100 main unit. Be sure not to use the upgrade firmware for other models such as TH7102MV/WV. Check the name plate on bottom of the main unit for the model number.
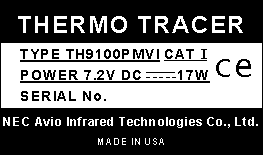
- Please don't upgrade the firmware in the main unit of special edition.
- Always use the AC adapter for power supply when upgrading the firmware. Do not use batteries while upgrading, in order to avoid accidental power supply interruption.
- Never remove the compact flash card during firmware upgrading.
- If the thermal image data recorded in the TH9100PMV/PWV is required, back up this data before upgradingperforming the upgrade.
2.Required Equipment
- Compact flash card (formatted, 16 Mbytes or larger)
- Personal computer with a PC card reader, compact flash card reader, or PC card slot. (A PC card adapter is required when using a compact flash card with a PC card reader or PC card slot.)
3.Procedure
- Download th9100mrwr.exe to a folder.
- Copy the "th9100mrwr.exe" file onto a root folder of the compact flash memory card.
- Double-click the "th9100mrwr.exe" icon and below files are uncompressed on the root folder. Make sure all of the below folders are present:
Firmware program: TH_LOAD.CMP
TH_N91.CMN
TH_I91.CMI
TH_U91.CNUUpdate contents file: ReadmeENG.txt (English) Update contents file: ReadmeJPN.txt (Japanese) - Confirm that the TH9100 main unit is turned off. If the power is turned on, turn off the power first, then connect an AC adapter. Insert the flash card that includes the firmware program into the TH9100 main unit.
- Turn on the power while pressing the E keyin the TH9100 main unit. Keep pressing the E key.
- Caution
- Never pull out the compact flash card during firmware upgrading.
- After 10 to 30 seconds following power-up while pressing the E key, the update screen (Ver2.0 or Ver3.0) of the TH9100 main unit appears. Firmware upgrading starts. Release the E key after this screen is displayed.
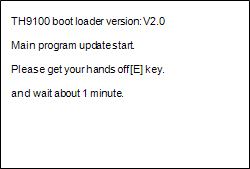
- Update screen (Ver2.0)
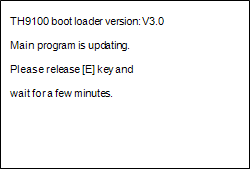
- Update screen (Ver3.0)
- Update completes after a few minutes, then below initialization screen appears.
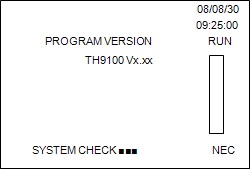
- Initialization screen
- Make sure the camera starts up normally and below Run screen is displayed.
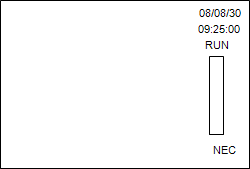
- Run screen
4.Version Display
Follow below instructions and check if updated version is identical to the version shown on the initially uncompressed file.
- Go to "SETUP" on menu and select "VERSION", then press the E key.
- The Version screen shows up as follows.
- Version screen
5.Others
- All copyrights on this software are reserved by Nippon Avionics. Unauthorized copying, reproduction, or modification of this software in whole or in part is prohibited.
- Copying of this software to a compact flash card is authorized only when upgrading the firmware embedded in the TH9100 main unit. No part of this software may be copied for other purposes.
- The contents of this software are subject to change without prior notice.
- This software is intended for Nippon Avionics customers who have purchased the TH9100.
6.Download
The file to download:
- th9100mrwr.exe (Self-extracting file) (EXE:3.88MB)
